DNNGo_DNNGalleryPro v6.6.3
Documentation
- Created: 27/07/2015
- Latest update: 16/11/2021
- By: Dnngo
- Email: dnnskindev@gmail.com
Thank you for purchasing our module. If you have any questions that are beyond the scope of this help file, please feel free to email via my user page contact form here. Thanks so much!
General Information
Dotnetnuke Information
To install this module you must have a working version of Dotnetnuke already installed. If you need help to install Dotnetnuke, follow the instructions in Documentation Center.
Description
DNNGallerypro is an Animated Effect Collection module.This module assembles multiple image effects like special effect scripts, slider, rotation, cyclical, circulation etc. Multiple theme styles in every Animated Effect can adapt to different skin styles. You can set parameters for each effect separately, which allows you to control the animation speed, interval time, slider mode conveniently. We will offer a regular updation with integration of fresh animated effects on a weekly basis, you can enjoy this value-added service free of charge.
- Compatibility with DNN8.X ~ DNN9.X.
- Compatibility with major browsers( IE、Firefox、Chrome、Safari.)
- Support multiple animated effects, support more fresh animated effects through updating the new version.
- Support changing multiple theme styles through single effect.
- Support control of appearance effect through setting parameters, the catagory and quantity of each parameter are separate.
- Support import/export data.
- Support data sharing between multiple modules.
- Fully works on mobile devices.
What Are The Requirements To Use DNNGalleryPro
To use module, you must be running DNN 8.x or higher. We have tested it with DNN 8.x and DNN 9.x.
Module Installation
Follow the steps below to install via Dotnetnuke.
For DNN 8
- Step 1. Login to the site as superuser administrator.
- Step 2. Go to Host –> Extensions –> Install Extension wizard to install the module pack DNNGo_DNNGalleryPro_0x.0x.0x_PA.zip .
- Step 3. After finishing installation, you can add the module to a pane on pages and start to use it.
For DNN 9
- Step 1. Login to the site as superuser administrator.
- Step 2. Go to Settings –> Extension to install the module pack DNNGo_DNNGalleryPro_0x.0x.0x_PA.zip.
- Step 3. After finishing installation, you can add the module to a pane on pages and start to use it.
Gallery settings
All Items
- Please log in to DNN using admin account and add DNNGo DNNGallery to a Pane.
- Click Manager link.
- Click All Items, this interface contains all the added data.
- You can order, modify or delete the existing data.

All New
You can add data in this page.
Import Export
You can import all the data from one module to another through this function.
- Click Export Article List button, the data will be exported as an XML file.
- Choose an exported XML file, click Import Content List to import the data in this XML file.

Effect List
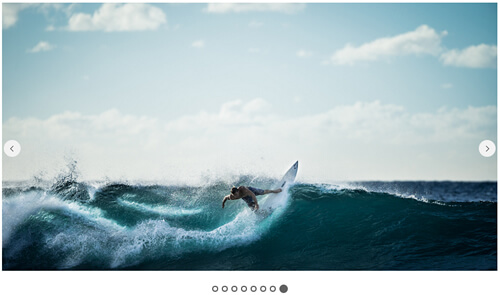
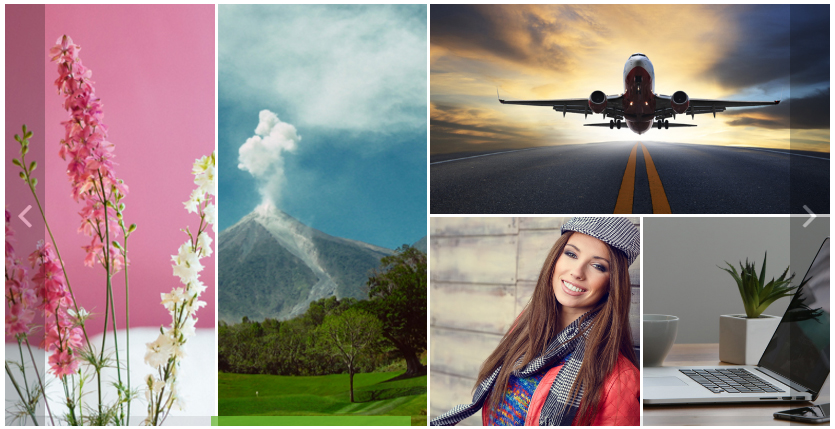
It includes 16 different image rotation effects in this module. You can click on Apply Effect button to select effect.
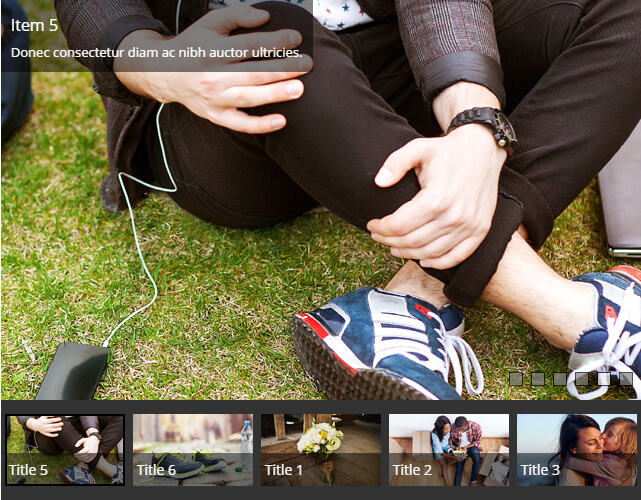
Effect_01_SlideShow_H
Below is the screen shot:
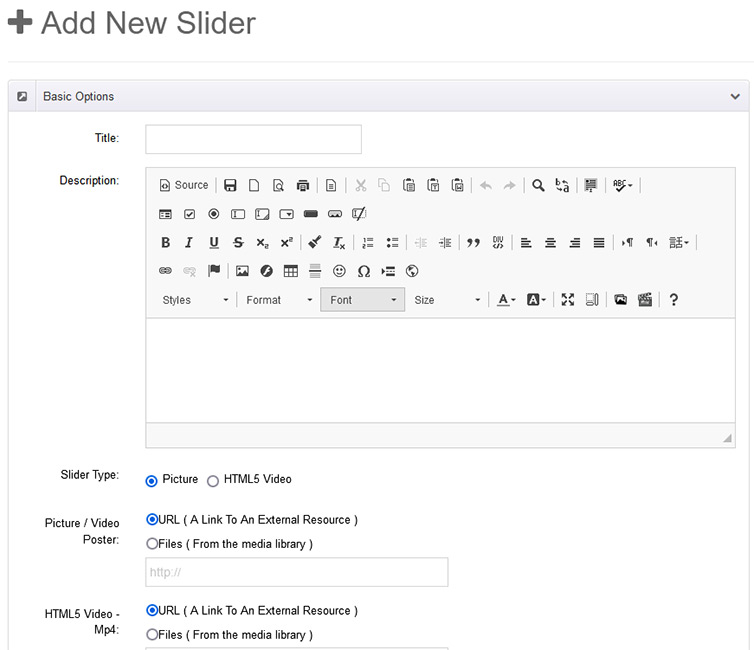
Basic Options
- Title - Set title texts of slider.
- Description - Set description texts of slider. Both Title and Description will show on the top of background image. As shown in the image:
- Slider Type - There are totally three slider types, which are Picture, HTML5 Video, Youtube Video. Picture - display slider with image. HTML5 Video - display slider with HTML 5 Video.
- Picture / Video Poster - Set background image for slider, it can also be used as cover of HTML 5 Video.
- HTML5 Video - To set HTML5 Video file, you need to upload files of three formats.
- Thumbnail - Set thumbnail image. It will show at the bottom of slider.
- Thumbnail Title - Set the title texts of thumbnail. As shown in image:

Description Options
You can set the animation effect, text color etc for description section, as well as set different animation effects for each slider.
Picture Link
Set link of slider image.
Effect Options
Here it includes global settings of slider.
Basic Options
Here you can set the width, height, animation time etc of slider.
Thumbnail Options
Here you can set the height, display number, text color etc of thumbnail image.
BulletNavigator Options
Here you can set the style and location of BulletNavigator.
ArrowNavigator Options
Here you can set the style and location of ArrowNavigator.
Description Options
Here you can set the animation effects, text color etc of description section.
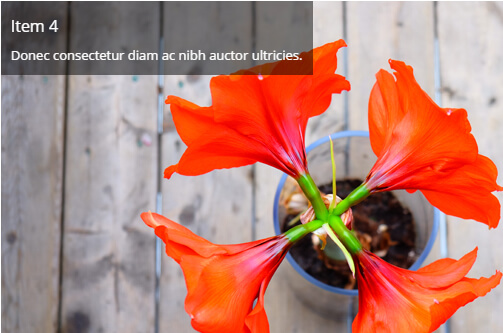
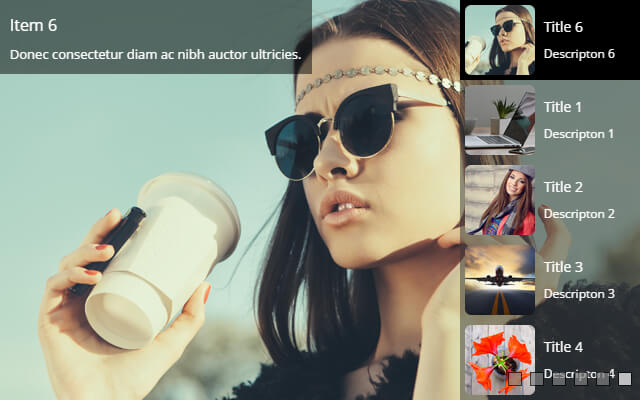
Effect_02_SlideShow_V
Effect_02_SlideShow_V and Effect_01_SlideShow_H share the same features. Just that thumbnail of Effect_02_SlideShow_V can be set to show on the left or on the right, as shown in image:
Effect_03_Carousel
Below is the screen shot:
Basic Options
- Title - Set title texts of item.
- Description - Description -Set description texts of item.
Thumbnail Options
You can set thumbnail as well as the link on the thumbnail.
- Link Type - Set the type of the link.
- Link Url - Set the address of URL. You need to check Link at Link Type, click thumbnail will open this url.
- Images Url - Set the address of images. Click thumbnail, the image will open in lightbox. You need to check Image at Link Type.
- Youtube Url - Set the address of youtube video. Click thumbnail, youtube will open in lightbox. You need to check youtube at Link Type.
- Vimeo Url - Set the address of the Vimeo video. Click thumbnail, Vimeo will open in lightbox. You need to check Vimeo at Link Type.
- Gmaps Url - Gmap Url- Set the address of Google Map. Click thumbnail, Google Map will open in Lightbox. You need to check Gmaps at Link Type.
Left Icon Options and Right Icon Options
It will show two icons when mousing over the thumbnail, as shown in image:
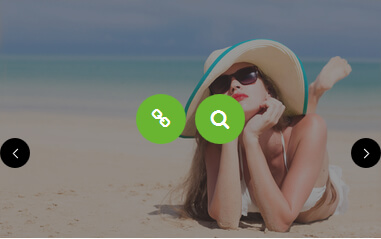
Here you can set the Link to icon, same way as thumbnail.
Effect Setting
Enable Single Setting - You can set different animation effects for each item.
Effect List - You can set the animation effect of mousing over the image. It includes 4 types in total. Check demo.
Left Icon Style - You can set the icon shape.
You can change background color, text color, icon color and background transparency, etc.
Border Setting
Set the style of border.
Other Setting
Set padding, background color and shadow.
Title Setting
Set style of title texts.
Description Setting
Set the style for description texts.
Effect Options
Here it includes the global settings of slider.
Effect Options > Basic Options
Here you can set the width, height, animation time, display number etc.
Effect Options > Title Setting
You can set the styles of title texts for all items.
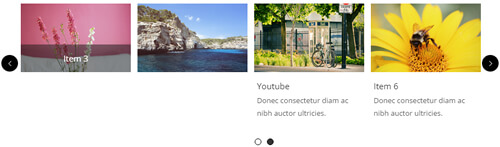
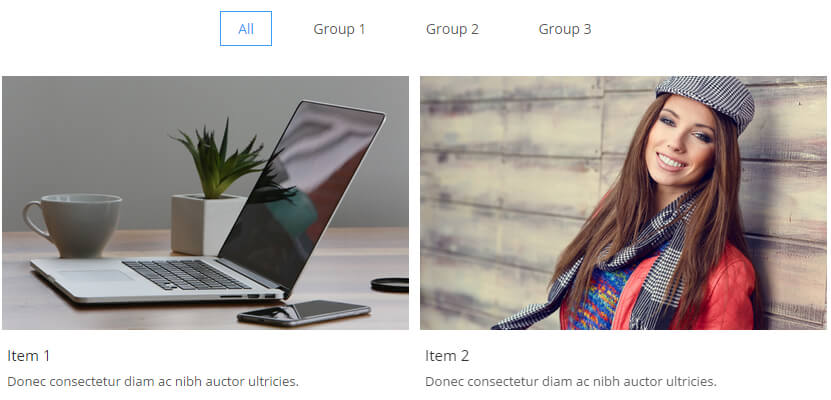
Effect_04_Isotope
This effect includes ajax's features. When scrolling down the browser, it will load images automatically, as shown in image.
The way for adding item is the same as Effect_03_Carousel.
You can set a group for each item, the name of the group will show at the top of the slider. Images of this group will show when clicking the group name.
Effect Options > Basic Options
- Page Size - Set the number of items shown in the first image.
- Loaded Data - Set the way that ajax data show.
On Scroll - It will show more items when scrolling down the browser.
On Click - It will show more items when clicking More button. - Scroll Show Max Page - Set the scrolling page number. If it exceeds this number when scrolling page, you will need to click More button to show more data.
- Item Min Width - Set the minimum width of item.
- Item Spacing - Set the padding between items.
- Default Filter - Set the group shown by default.
- Display All - Set whether to display All button or not.
- Display group - Set whether to display group navigation.
- Lightbox Animation - Set Lightbox animation effect.
Effect_05_ResponsiveTabs
Below is the screen shot:

Add New > Basic Options
- Title - Set title texts of item.
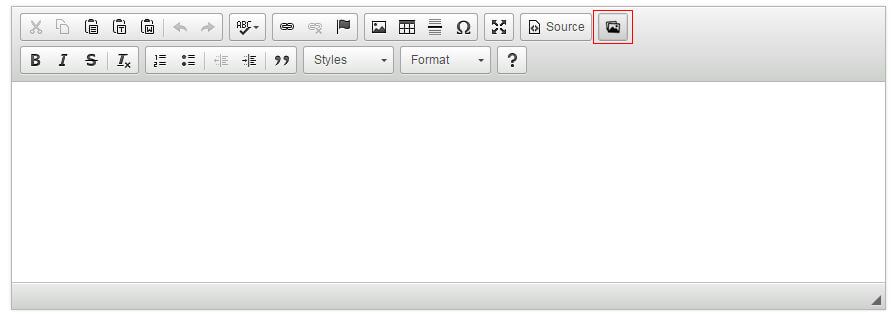
- Content Html - Set the content part of item. Inner page can be texts and images. Click image icon to insert images. As shown in image:|
Effect Options > Basic Options
- Tab Layout - Set layout of tab, it includes 4 types in total.
- Tab Title Background Color - Set the background color of tab title.
- Tab Title Color - Set the text color of tab title.
- Tab Content Color - Set the text color of content area.
- Tab Border Color - Set the border color of the tab.
- Tab Background Color - Set the background color of content area.
Effect_06_Accordion
Below is the screen shot:
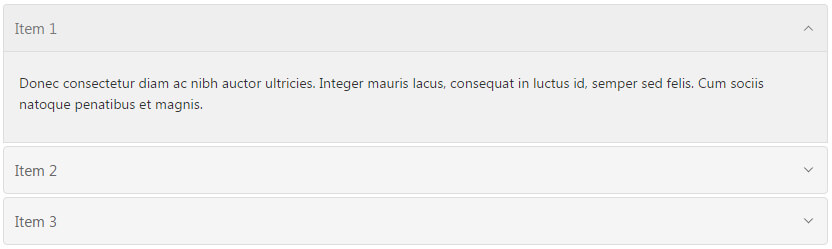
Add New > Basic Options
- Interval - Set the interval time of animation.
- Default Open Index - Set to expand which item by default.
- Fade Content - Set whether to have animation effect for content area.
- Open - Set whether to expand the item by default.
Effect Options > Style Setting
Here you can set the text color, background color, border color etc for the item.
Effect_07_FlipBox
Below is the screen shot:
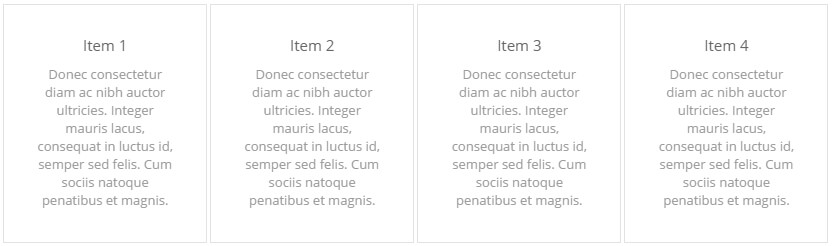
Add New > Basic Options
Each item includes front content and back content. Back content will flip over to display when mousing over the front.
- Front Title - Set title texts of the front.
- Front Content - Set the content texts of the front.
- Back Title - Set title texts of the back.
- Back Content - Set the content texts of the back.
- Flip Style - Set the flip direction.
Effect Options > Basic Options
- Page Size - Set the item number shown on each page.
- Number of columns ( Large Desktop ) - Set the number displayed in each row in Large Desktop.
- Number of columns( Small Desktop ) - Set the number displayed in each row in Small Desktop.
- Number of columns ( Tablet ) - Set the number displayed in each row in Tablet.
- Number of columns ( Phone ) - Set the number displayed in each row in Phone.
- Item Spacing - Set the spacing between each item.
Effect Options > Front Setting
Set the text color, background color, border color etc of the front.
Effect Options > Back Setting
Set the text color, background color, border color etc of the back.
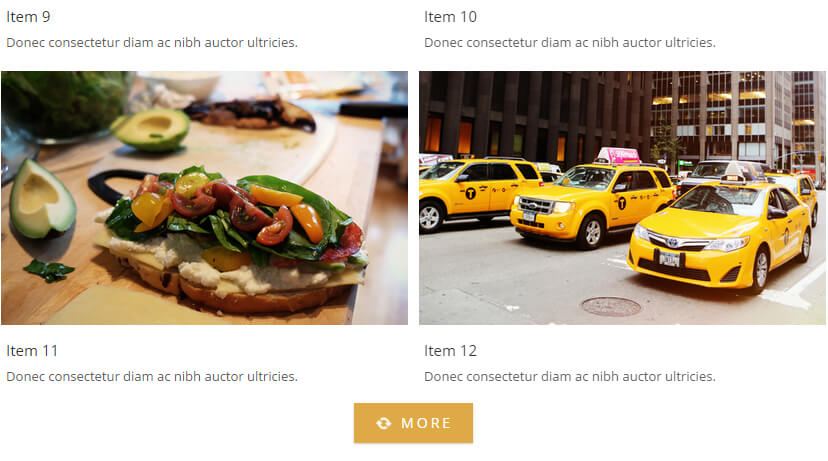
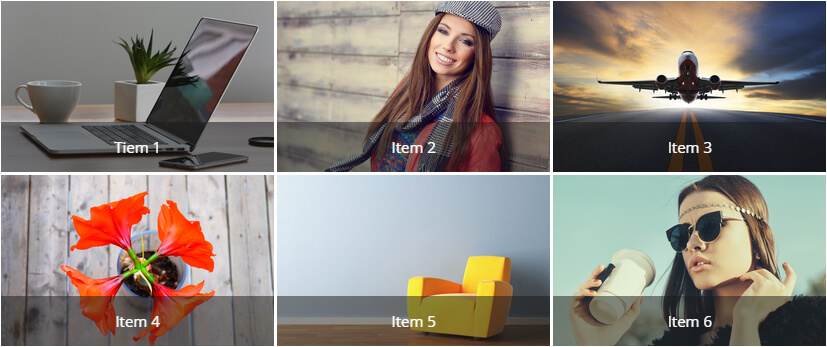
Effect_08_PhotoGallery
Below is the screen shot:
Add New > Basic Options
Here you can set title and description texts.
Add New > Thumbnail Options
Here you can set the image of thumbnail.
Add New > Left Icon Options and Right Icon Options
It will display two icons when mousing over the thumbnail, here you can set the link to icon.
Add New > Effect Setting
Here you can set the animation when mousing over the image.
Effect Options > Basic Options
- Page Size - Set the number of items displayed on each page.
- Number of columns ( Large Desktop ) - Set the number displayed in each row in Large Desktop.
- Number of columns( Small Desktop ) - Set the number displayed in each row in Small Desktop.
- Number of columns ( Tablet ) - Set the number displayed in each row in Tablet.
- Number of columns ( Phone ) - Set the number displayed in each row in Phone.
- Item Spacing - Set the spacing between each item.
Effect_9_ResponsiveSlide
Below is the screen shot:
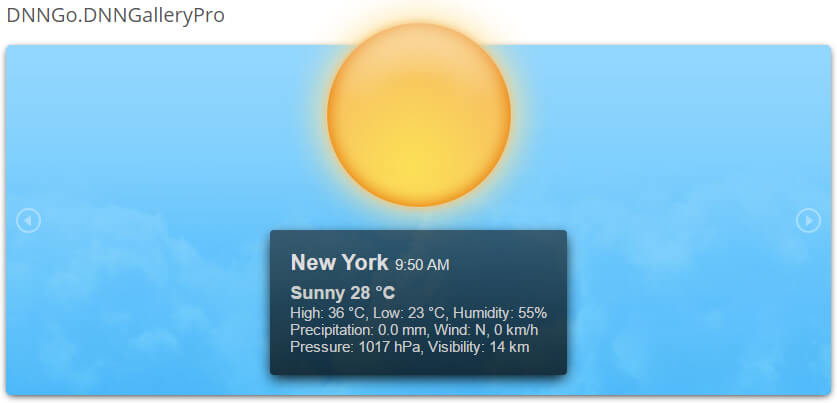
Effect_10_WeatherSlider
Below is the screen shot:
Add New > Basic Options
- City - Set the city.
- Country - Set the country.
Effect Options > Basic Options
- Theme Name - -Set the theme for the current effect.
- Width -Set width for the module..
- Height - Set height for the module..
- CSS Animations - Enables or disables CSS3 animations (snow, rain, wind, lightnings). Note, that CSS3 animations will work only in Google Chrome, Apple Safari and Mozilla Firefox browsers. In other browsers the script will animate weather elements using jQuery.
- JS Animations - If CSSanimations and JSanimations are both disabled, the script won't animate snow, rain, wind and lightnings.
- Snow - You can switch off the animation of snow..
- Rain - You can switch off the animation of rain.
- Wind - You can switch off the animation of wind.
- Lightnings - You can switch off the animation of lightnings.
- Windy Weather - You can set the minimum value (in kmph) of the windy weather. If the wind speed of the current weather is higher than the value, the script will animate the background.
- Wind Direction - You can set the direction of the background animation if the weather is windy.
- Icy Temp - You can set the temperature (in °C) of icy weather. If the current temperature is lower than the value, the script will show the icy layer.
- Measurement - The type of the measurement.
- Daytime Day - The script tries automatically determine whether is day or night. If fails, it will use these settings. With this you can specify the interval when it is daytime.
- Daytime Night - The script tries automatically determine whether is day or night. If fails, it will use these settings. With this you can specify the interval when it is daytime.
- Info Duration - The duration of the animation of infobox.
- InfoEasingType 1 - The easing types of the animation of infobox.
- InfoEasingType 2 - The easing types of the animation of infobox.
- Reduction - The script automatically scales everything (graphic elements, font sizes, etc) depending on the width and height of the container. You can override it with a number between 0 and 1.
- Filmstrip Size - Number of frames to show in filmstrip-only gallery.
- Keyb Nav - If true, than you can navigate with left and right arrow keys. Note, that if there are more than one sliders on the same page you should disable this setting.
- Touch Nav - If true, than you can navigate with swiping your finger over the slider on touch screen mobile devices.
- Responsive - Enable this option to turn WeatherSlider into a responsive slider.
- Enable Search Field - You can show / hide the search field.
- Enable Weather Info - You can show / hide the weather infobox.
- Enable Forecast - You can show / hide the 3 days forecast feature.
- RefreshInterval - Auto refresh. If you enter a value, WeatherSlider will refresh the weather conditions in the current location automatically. The value is in ms so if you need to refresh in 5 secs you should add 5000 to the value (0 means false, auto refresh off).
- Time Format - You can switch between 12 and 24 hour time formats.
- Show Loc - You can show / hide current location.
- Show Time - You can show / hide current time.
- Show Cond - You can show / hide current weather condition information.
- Show Temp - You can show / hide current temperature information.
- Show Low - You can show / hide low temperature information.
- Show High - You can show / hide high temperature information.
- Show Hum - You can show / hide humidity information.
- Show Prec - You can show / hide precipitation information.
- Show Wind - You can show / hide wind information.
- Show Press - You can show / hide pressure information.
- Show Vis - You can show / hide visibility information.
- Show F Day - You can show / hide the name of the day in the forecast.
- Show F Cond - You can show / hide weather conditions in the forecast.
- Show F Low - You can show / hide low temperature information in the forecast.
- Show F High - You can show / hide high temperature information in the forecast.
- Hide Background - Show or hide background image.
- Always Show Forecast - WeatherSlider will always show weather forecast.
- Always Show Search - WeatherSlider will always show the custom location search box.
- WWO API Key - You must sign up to get your own WorldWeatherOnline API key! Please do NOT use our API key, except for testing only! The registration for your API key is free: http://developer.worldweatheronline.com/member/register
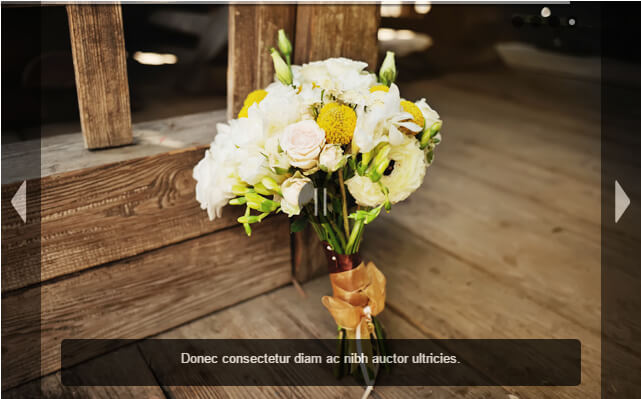
Effect_11_TransBanner
Below is the screen shot:
![]()
Add New > Basic Options
- Title - Set title texts of slider.
- Description - Set description texts of slider.
- Picture - Set the image of slider.
- Picture Link - Set the url address of image.
- Enable Slide delaytime - enable the delay time of single slider.
- Slide delaytime - Set the delay time of single slider.
- Translucent Captions - Set the background of caption whether to be translucent.
- Caption Position - Set the location of caption on the background.
- Caption Width - Set the width of caption.
- Caption Height - Set the height of caption.
- Caption BG color - Set the background color of caption.
- Caption BG opacity - Set the transparency of caption background.
- Caption BG shadow - Set the shadow effect of the caption background.
Effect Options > Basic Options
- Max Width - Set max width for slideshow.
- Height - Set height for the slideshow.
- Slide autoplay - To make the slideshow change images automatically from start.
- Slide delaytime - The delay time between each slide when it plays. Delay time in seconds.
- Slide transition - The type of Transition effect while changing slides. The available transitions are:1. Move,2. Fade,3. Slide In,4. Slide Out.
- Slide Transition Period - The time taken to complete image transition. The value in milliseconds. The transition speed can be reduced by increasing this value.
- Slide Preload Images - How many number of images should be loaded before start showing the banner. The value 1 means the banner will start showing content once the 1st image loaded.
- Slide Random Order - To randomize the order of images on each time the page loads.
- Button Show Next - To show or hide the Next Arrow Button.
- Button Show Back - To show or hide the Back Arrow Button.
- Button Show Timer - To show or hide the Timer Clock / Play Pause Button.
- Button Show Numbers - To show or hide the Number Buttons.
- Button Numbers Autohide - The Number buttons appears when mouse pointer placed over the Next Button. Instead of that, the Number buttons can be permanently shown by setting this value as false.
- Button Numbers Horizontal - To make the Number Buttons to appear / align horizontally, make this value true.
- Navigation Type - There are 3 different navigation styles available: 1. Default - Arrow Buttons, Number Buttons, Timer Clock and Play/Pause Buttons 2. Dot - Bullet type 3. Arrow - Previous & Next Buttons only.
- Caption float mode - The default caption will always align to bottom of the banner. To make the caption to freely position over the image, set this value to true. And do the one of the following.
Effect_12_UnoSlider
Below is the screen shot:
Add New > Basic Options
Effect Options > Basic Options
- Theme Name -Set the theme for the current effect.
- Slider width - Set width for the module.
- Slider height - Set height for the module.
- Slideshow Speed - Set duration time for slideshow transition .
- Preset - You can set as many presets as you want.
- Navigation Autohide - Auto hide whole navigation or only specific part of navigation on mouse over.
- Scale - Should the images be resized in order to fit the slider or not.
- Responsive - This option makes the slider responsive. This means that the slider adjusts the width of the parent element if it is wider then the slider.
- Mobile - Simpler optimized transitions on mobile devices. Set to false if you want to use the same transitions on desktops and mobile devices.
- Touch - Enable touch controls on the mobile devices.
- Indicator - Set it to the false if you want to hide the indicator.
- Show Title - Set title for slideshow.
- Slideshow Autostart - Slideshow starts running automatically after Loading.
- Slideshow Timer - Display a small indicator of time remaining to the next slide change.
- Slideshow HoverPause - Pause slideshow on mouse over.
- Slideshow Continuous - Slideshow does not stop after a manual change of a slide. Set to false if you want to stop the slideshow after a manual change.
- Slideshow Infinite - Slideshow continues in an infinite loop.
Effect_13_Scrolling
Below is the screen shot:

Add New > Basic Options
Here you can set title and description texts.
Add New > Thumbnail Options
Here you can set the image of thumbnail.
Add New > Left Icon Options and Right Icon Options
It will display two icons when mousing over the thumbnail, here you can set the link to icon.
Add New > Effect Setting
Here you can set the animation when mousing over the image.
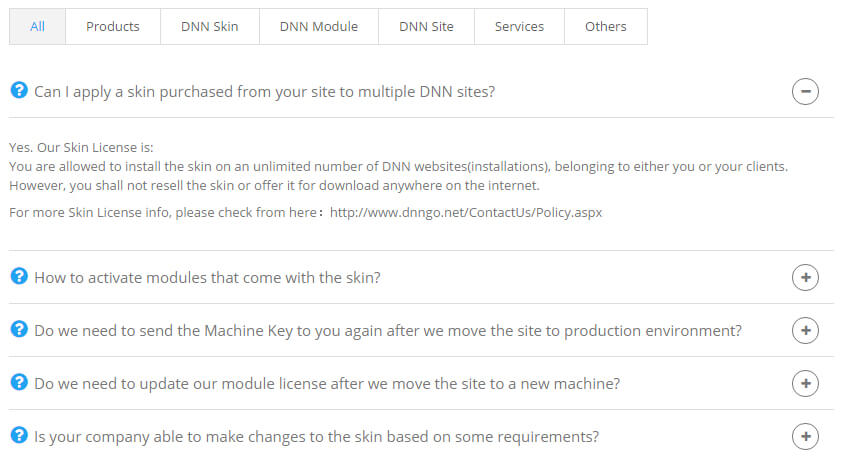
Effect_14_FAQ
Below is the screen shot:
Add New > Basic Options
- Title - Set the texts of question.
- Content Html - Set the texts of answer.
- Icon Style - Set the style of icon.
Groups
Here you can add category.
Effect Options > Basic Options
- Page Size - Set the number of items shown in each page.
- Interval - Set the interval time of animation.
- Default Open Index - Set to expand which item by default.
- Fade Content - Set whether to have animation effect for content area.
- Open - Set whether to expand the item by default.
- Default Filter - Set the category to be shown by default.
Effect_15_ContentSlider
Below is the screen shot:
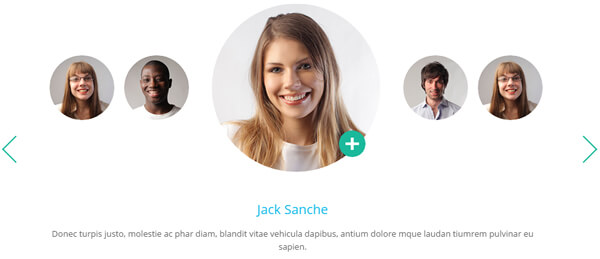
Add New > Basic Options
- Title - Set texts of title.
- Thumbnail - Set thumbnail .
- Description - Set description texts.
Thumbnail Link
Set link to thumbnail.
- Link Type - Set the type of the link.
- Link Url - Set the address of URL. You need to check Link at Link Type, click thumbnail will open this url.
- Images Url - Set the address of images. Click thumbnail, the image will open in lighbox. You need to check Image at Link Type.
- Youtube Url - Set the address of youtube video. Click thumbnail, youtube will open in lightbox. You need to check youtube at Link Type.
- Vimeo Url - Set the address of the Vimeo video. Click thumbnail, Vimeo will open in lightbox. You need to check Vimeo at Link Type.
- Gmap Url - Set the address of Google Map. Click thumbnail, Google Map will open in Lightbox. You need to check Gmaps at Link Type.
Effect Options > Basic Options
- Max shown items - The number of visible circles
- Small pic width - Width (in pixels) of the small circles.
- Small pic height - Height (in pixels) of the small circles.
- Big pic width - Width (in pixels) of the big circle.
- Big pic height - Height (in pixels) of the big circle.
- Child div width - Width (in pixels) of the whole area around the small circle (including the very circle). If you change 'small_pic_width' value, change this too..
- Child div height - Height (in pixels) of the whole area around the small circle (including the very circle). If you change 'small_pic_height' value, change this too.
- Auto play - 1 means auto-play is ON, the slider will move circles automatically
- Auto play pause time - Interval of auto-play, pause between sliding, expressed in miliseconds (1000 miliseconds = 1 second)
- Hide arrows - Hide the arrows (0=no, 1=yes)
- Main circle position - 0 = Main circle is centered, 1 = left aligned, 2 = right aligned.
- Border radius - -1 is full circle, any other (larger) value will set the border radius
- H/V switch - 0 means horizontal plugin variant, 1 means vertical plugin variant
- Wrapper text Min Height / Max Width - It is the minimum height under horizontal mode, and maximum width under vertical mode.
- Icon Bg - Set the background color of + icon.
- Arrows Color - Set the color of arrow.
Effect_16_VerticalScroll
Below is the screen shot:
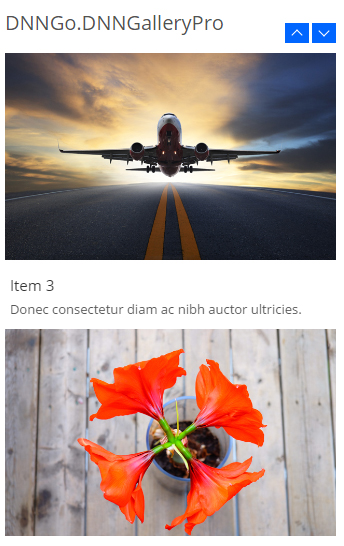
The way for adding item is the same as Effect_03_Carousel.
Effect Options > Basic Options
- Show items - The number of items shown in one page.
- Roll items - The number of items that scroll at a time.
- Item height - Height of the item, value: auto and int
- Auto Play - 0: not to play automatically, int>0 : interval of auto play
- Auto Play Speed - Transition speed
- Stop on hover - Stop autoplay on mouse hover
- Direction - Direction of auto play.
Effect_17_Timeline
Below is the screen shot:

Add New > Basic Options
- Title - Set texts of title.
- Summary - Set summary texts.
- Description - Set description texts. Click More to display texts.
- Thumbnail - Set thumbnail .
- Picture - Set images for lightbox.
More Options
- More Link Type - Set the type for More.
- Link Url - Set the link for More.
- More Text - Set texts for More.
Effect Options > Basic Options
- Start Item- Set the starting position for slider.
- Item Width - Set the width for item.
- Item Height - Set the height for item.
- Item Margin - Set the spacing for item.
- Accent Color - Set accent color.
Effect_18_GoogleMap
Below is the screen shot:
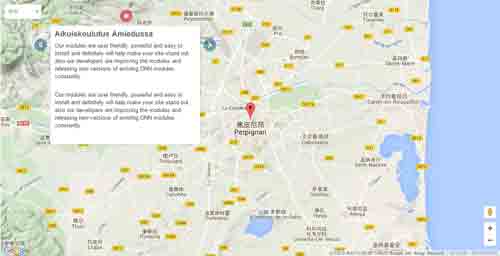
Add New > Basic Options
- Marker Address - Set the location for Marker.
- Marker Data - Set texts on Marker.
- Description - Set the description on Marker.
- Marker Icon - Set the image on Marker.
Effect Options > Basic Options
- Map Width - Set the width for Map.
- Map Height - Set the height for Map.
- Default Zoom - Set the default zoom in value.
- Display Route - Set the route between two points. The first location in the list is point A, and the second one is point B.
Effect Options > StreetViewPanorama
- Display StreetViewPanorama - Whether to display the Street View or not, settings here will replace markers on the map.
Effect_19_Chart
Below is the screen shot:
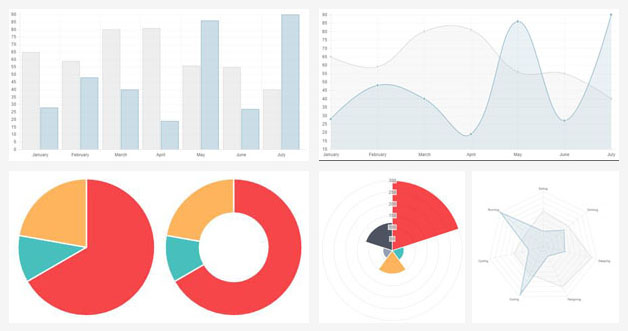
Add New > Basic Options
- Date - If you use the type Bar & Line & PolarArea, you need to input an array of numbers. For example: 30,25,40,20,80,65,90 . If you use the type PolarArea & Pie & Doughnut, you need to input an individual number. For example: 30
Effect Options > Basic Options
- Labels - Only after you use the type Bar & Line & PolarArea will the settings here work. For example: "January","February","March","April","May","June","July".
- Chart Type - 5 different types in total are included.
Effect_20_Pricing
Below is the screen shot:
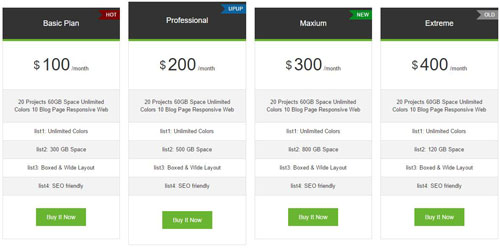
Add New > Basic Options
- Here you can add the texts included in each column.
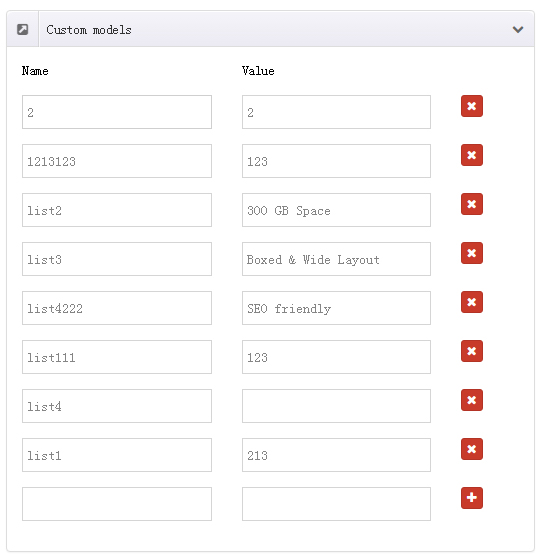
- Custom models - You can set some extra fields, as shown in the following image.
Effect Options > Left Header Settings
- One more column of info can be displayed on the very left side of the table.
Effect_21_Socialsider
Below is the screen shot:
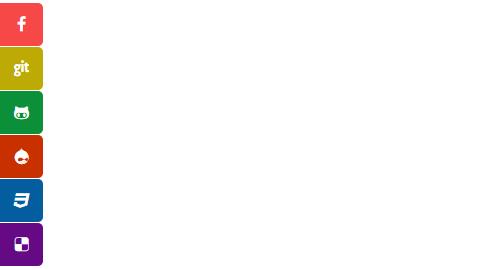
Add New > Basic Options
- Icon Style - Set the appearance for icon.
- Link Url - Set the url link for icon.
- Icon Background - Set the background color for icon.
Effect Options > Basic Options
- The position, size and animation effect can be set for the icon.
Effect_22_ComingSoon
Below is the screen shot:
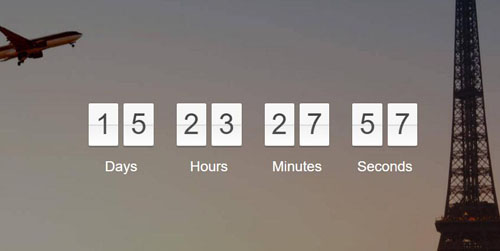
Effect Options > Basic Options
- Full Screen Mode - Set whether to display in full-screen or not. Settings of width and height will be replaced when it is set here.
- End Settings - Set what will happen when countdown ends. It can be redirecting a new page or displaying a piece of content.
- Content Settings - Additional content can be added to the above and below area of countdown.
Effect_23_ImageCarousel
Below is the screen shot:
Add New Slider
- Template Settings - A total of 8 templates are included. The first template just includes one image, so images need to be set in Image01 Settings. The second template includes two images, so images need to be set in Image01 Settings and Image02 Settings.
- Groups - groups can be set for item.
Effect Options > Basic Options
- Template Width - Set the width for image template.
- Template Height - Set the height for image template.
- Item Spacing - Set the spacing between each image.
- Default Category - Set the category shown by default.
Media Library
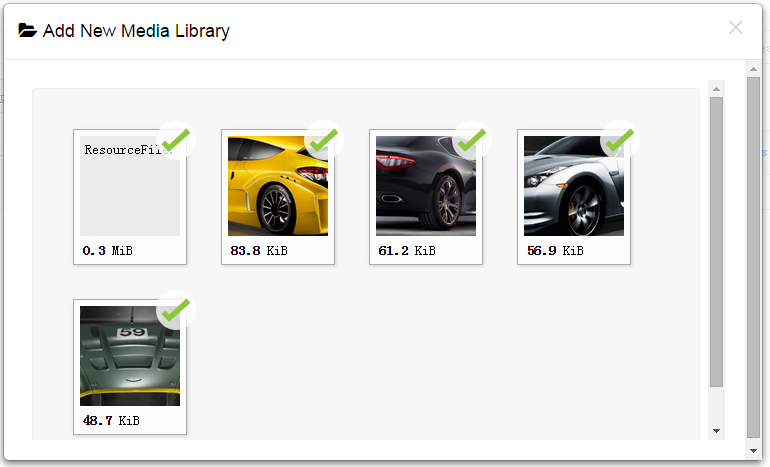
You will get to know how images and media files work in this module via the following description, we offer two ways to upload images.
Media List
You can redirect to two interfaces of adding files through "Add New" or "Synchronize Files". All images of xBlog module will display here, all xBlog module images under single child site are shared.
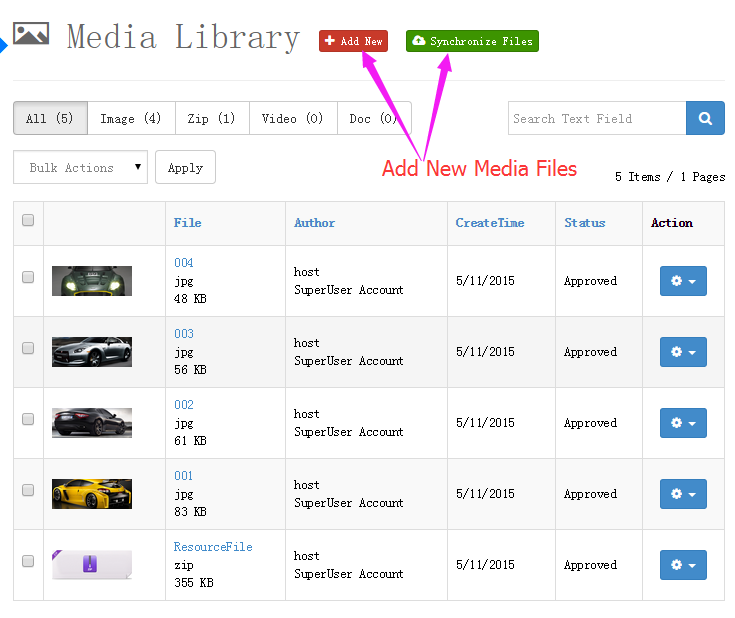
- You can click "Add New" to batch upload images directly.
-
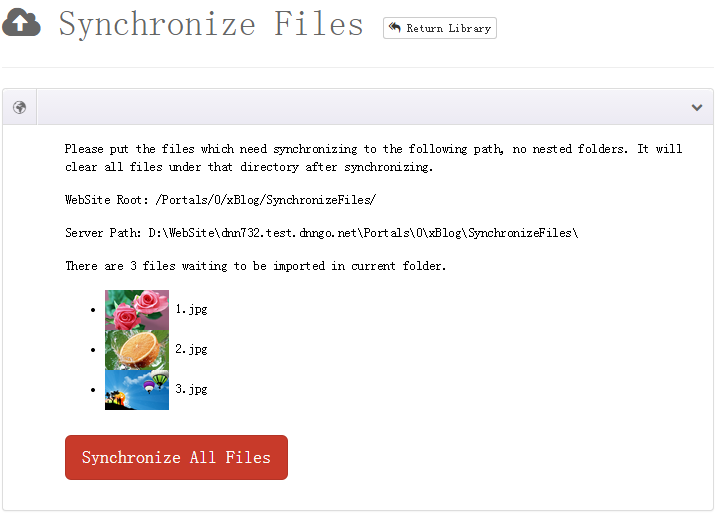
You can click "Synchronize Files" to batch import images directly.
If you have more files to upload, the method above is not that helpful. At this time you can try this method.
Put the files need importing into specified folder, it will prompt number of the files to import after refreshing the page, click "Synchronize All Files" button and everything is done.
General Settings
General Settings
- The data in this module can come from other portal or data from DNNGallery in other pages.
- Portals - All portals will be listed under the drop down.
- Tab & Module - All pages with DNNGallery module installed will be listed under the dropdown.
Data Filter
- Default - Default order.
- Random - Display data randomly, slideshow will show up on every page refresh.
- Start Time ASC - Sorted according to the publishing time.
- Start Time DESC - Sorted according to the publishing time.
License interface
- You need to go here http://www.dnngo.net and register.
- Please install the module in DNN and add it in a page. Then click the License link to obtain the Machine Key.
- You can send one email to dnnskindev@gmail.com and tell us your Invoice ID, Machine Key and Username. After that, we will generate one piece of license information. If your site is a demo site, the license is still valid when you transfer your demo site to your live site.
- You can go here http://www.dnngo.net/MyAccount/OnlineAuthorization.aspx and manage your license information.